こちらはこの章のコード例です。これらのページは現在、時間をかけて更新されています(画像、キャプションの追加、おそらくさらなる例の追加)。更新のためにもう一度訪れてください。もちろん、このページを説明が得られる本と一緒に使用するのが最善の方法です。

図9.1 – 水中で泳ぐアヒル
\documentclass[tikz,border=10pt]{standalone}
\usetikzlibrary{shapes.geometric,decorations.pathmorphing,backgrounds}
\usepackage{tikzducks}
\begin{document}
\begin{tikzpicture}
  \duck[laughing]
  \fill[top color=white, bottom color=blue, opacity=0.5]
    (-1,-0.2) -- (-1,0.5)
    decorate[decoration={snake}]{-- (3,0.5)} -- (3,-0.2);
\end{tikzpicture}
\end{document}
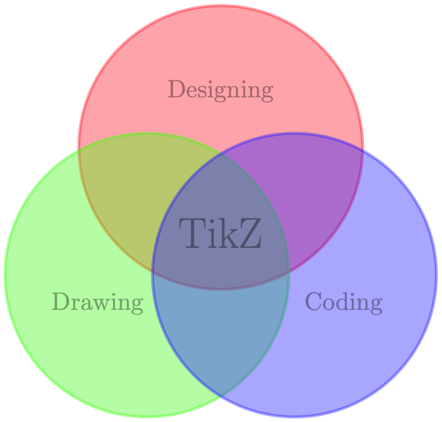
図9.2 – 完全に透明な図
\documentclass[tikz,border=10pt]{standalone}
\begin{document}
\begin{tikzpicture}[very thick,opacity=0.4]
  \filldraw[red]   ( 90:1.2) circle (2);
  \filldraw[green] (210:1.2) circle (2);
  \filldraw[blue]  (330:1.2) circle (2);
  \node at ( 90:2)    {Designing};
  \node at (210:2)    {Drawing};
  \node at (330:2)    {Coding};
  \node [font=\LARGE] {TikZ};
\end{tikzpicture}
\end{document}
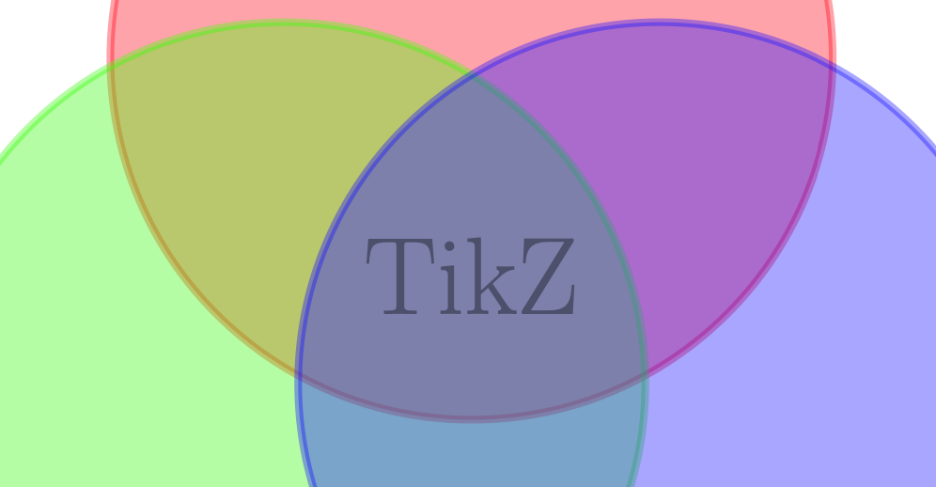
図9.3 – 透明性のあるエリアの境界線
\documentclass[tikz,border=10pt]{standalone}
\begin{document}
\begin{tikzpicture}[very thick, opacity=0.4]
  \filldraw[red]   ( 90:1.2) circle (2);
  \filldraw[green] (210:1.2) circle (2);
  \filldraw[blue]  (330:1.2) circle (2);
  \node at ( 90:2)    {Designing};
  \node at (210:2)    {Drawing};
  \node at (330:2)    {Coding};
  \node [font=\LARGE] {TikZ};
\end{tikzpicture}
\end{document}
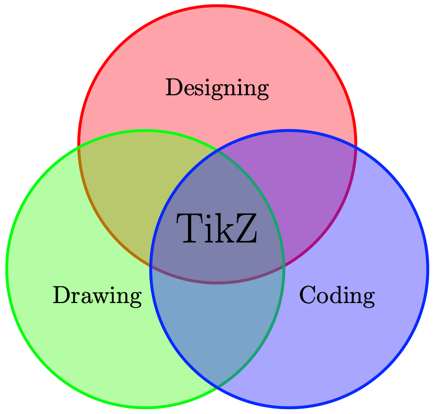
図9.4 – 不透明な曲線とテキストを持つ透明エリア
\documentclass[tikz,border=10pt]{standalone}
\begin{document}
\begin{tikzpicture}[very thick, fill opacity=0.4]
  \filldraw[red]   ( 90:1.2) circle (2);
  \filldraw[green] (210:1.2) circle (2);
  \filldraw[blue]  (330:1.2) circle (2);
  \node at ( 90:2)    {Designing};
  \node at (210:2)    {Drawing};
  \node at (330:2)    {Coding};
  \node [font=\LARGE] {TikZ};
\end{tikzpicture}
\end{document}
\documentclass[tikz,border=10pt]{standalone}
\begin{document}
\begin{tikzpicture}[very thick, fill opacity=0.4, text opacity=1]
  \filldraw[red]   ( 90:1.2) circle (2);
  \filldraw[green] (210:1.2) circle (2);
  \filldraw[blue]  (330:1.2) circle (2);
  \node at ( 90:2)    {Designing};
  \node at (210:2)    {Drawing};
  \node at (330:2)    {Coding};
  \node [font=\LARGE] {TikZ};
\end{tikzpicture}
\end{document}

図9.5 – 重なり合う透明オブジェクト
\documentclass[tikz,border=10pt]{standalone}
\usepackage{babel}
\usepackage{blindtext}
\begin{document}
\begin{tikzpicture}
  \begin{scope}[opacity=0.6]
    \draw [line width=4mm, red] circle(1);
    \fill[rounded corners, fill=red, rotate=15]
      (-1.3,-0.2) rectangle (1.3,0.2);
  \end{scope}
  \node[rotate=15] {TOP SECRET};
\end{tikzpicture}
\end{document}

図9.6 – 透明性のグルーピング
\documentclass[tikz,border=10pt]{standalone}
\usepackage{babel}
\usepackage{blindtext}
\begin{document}
\begin{tikzpicture}
  \begin{scope}[opacity=0.6, transparency group]
    \draw [line width=4mm, red] circle(1);
    \fill[rounded corners, fill=red, rotate=15]
      (-1.3,-0.2) rectangle (1.3,0.2);
  \end{scope}
  \node[rotate=15] {TOP SECRET};
\end{tikzpicture}
\end{document}
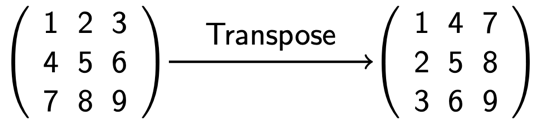
図9.7 – 行列の転置を表示する図
\documentclass[tikz,border=10pt]{standalone}
\usetikzlibrary{matrix,positioning,quotes,decorations.pathreplacing,arrows.meta}
\tikzset{standard/.style={matrix of nodes, left delimiter={(},
  right delimiter={)}, inner sep=0pt, nodes={inner sep=0.3em}}}
\begin{document}
\begin{tikzpicture}[every node/.append style={font=\sffamily}]
  \matrix[standard] (m)  {
       1 & 2 & 3 \\
       4 & 5 & 6 \\
       7 & 8 & 9 \\};
  \matrix[standard,right = 3cm of m] (n) {
       1 & 4 & 7 \\
       2 & 5 & 8 \\
       3 & 6 & 9 \\};
  \draw[->,shorten <=1em,shorten >=1em,thick] (m.east) to["Transpose"] (n);
\end{tikzpicture}
\end{document}
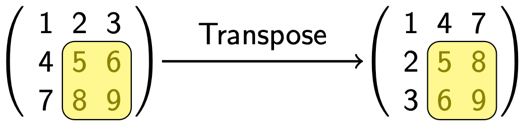
図9.8 – 行列の一部をハイライト表示
\documentclass[tikz,border=10pt]{standalone}
\usetikzlibrary{matrix,positioning,quotes,tikzmark}
\tikzset{standard/.style = {matrix of nodes, inner sep=0pt,
  nodes={inner sep=0.3em},
  left delimiter={(}, right delimiter={)}}}
\tikzset{submatrix/.style = {rectangle, rounded corners,
  fill=yellow, fill opacity=0.5}}
\tikzset{every node/.append style = {font=\sffamily}}
\begin{document}
\begin{tikzpicture}
  \matrix[standard] (m)  {
       1 & 2 & 3 \\
       4 & 5 & 6 \\
       7 & 8 & 9 \\};
  \matrix[standard,right = 3cm of m] (n) {
       1 & 4 & 7 \\
       2 & 5 & 8 \\
       3 & 6 & 9 \\};
  \draw[->,shorten <=1em, shorten >=1em, thick]
    (m.east) to["Transpose"] (n);
\draw[submatrix] (m-2-2.north west) rectangle (m-3-3.south east);
\draw[submatrix] (n-2-2.north west) rectangle (n-3-3.south east);
\end{tikzpicture}
\end{document}
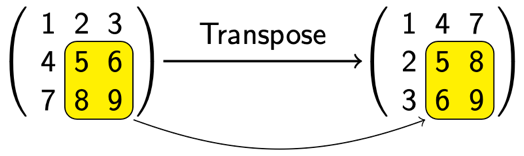
図9.9 – 行列の一部の背景をハイライト表示
\documentclass[tikz,border=10pt]{standalone}
\usetikzlibrary{matrix,positioning,quotes,fit}
\usetikzlibrary{backgrounds}
\tikzset{standard/.style={matrix of nodes,left delimiter={(},right delimiter={)},inner sep=0pt,nodes={inner sep=0.3em}}}
\tikzset{submatrix/.style = {rectangle, rounded corners,
  fill=yellow, draw, inner sep=0pt}}
\begin{document}
\begin{tikzpicture}[every node/.append style={font=\sffamily}]
  \matrix[standard] (m)  {
       1 & 2 & 3 \\
       4 & 5 & 6 \\
       7 & 8 & 9 \\};
  \matrix[standard,right = 3cm of m] (n) {
       1 & 4 & 7 \\
       2 & 5 & 8 \\
       3 & 6 & 9 \\};
  \draw[->,shorten <=1em,shorten >=1em,thick] (m.east) to["Transpose"] (n);
 \begin{scope}[on background layer]
   \node (m1) [submatrix, fit=(m-2-2) (m-3-3)] {};
   \node (n1) [submatrix, fit=(n-2-2) (n-3-3)] {};
 \end{scope]
 \draw [->] (m1.south east) to[bend right=20] (n1.south west);
\end{tikzpicture}
\end{document}
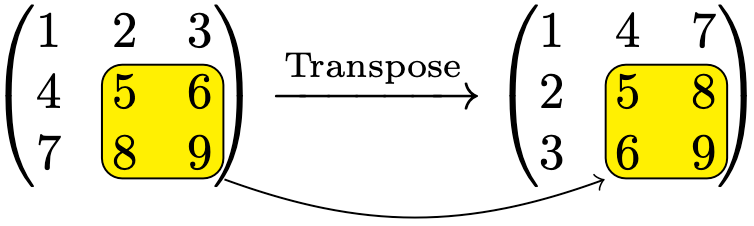
図9.10 – LaTeX方程式の背景に描画
\documentclass{article}
\usepackage{amsmath}
\usepackage{tikz}
\usetikzlibrary{fit,tikzmark}
\tikzset{submatrix/.style = {draw, rectangle, rounded corners,
  fill=yellow}, inner sep=2pt}
\pagestyle{empty}
\begin{document}
\begin{tikzpicture}[overlay, remember picture]
  \node (m) [submatrix, fit={([yshift={1.5ex}]pic cs:m1) (pic cs:m2)}] {};
  \node (n) [submatrix, fit={([yshift={1.5ex}]pic cs:n1) (pic cs:n2)}] {};
  \draw [->] (m.south east) to[bend right=20] (n.south west);
\end{tikzpicture}
\[
  \begin{pmatrix}
       1 & 2 & 3 \\
       4 & \tikzmark{m1}5 & 6 \\
       7 & 8 & 9\tikzmark{m2}
  \end{pmatrix}
  \xrightarrow{\text{Transpose}}
  \begin{pmatrix}
     1 & 4 & 7 \\
     2 & \tikzmark{n1}{5} & 8 \\
     3 & 6 & 9\tikzmark{n2}
  \end{pmatrix}
\]
\end{document}
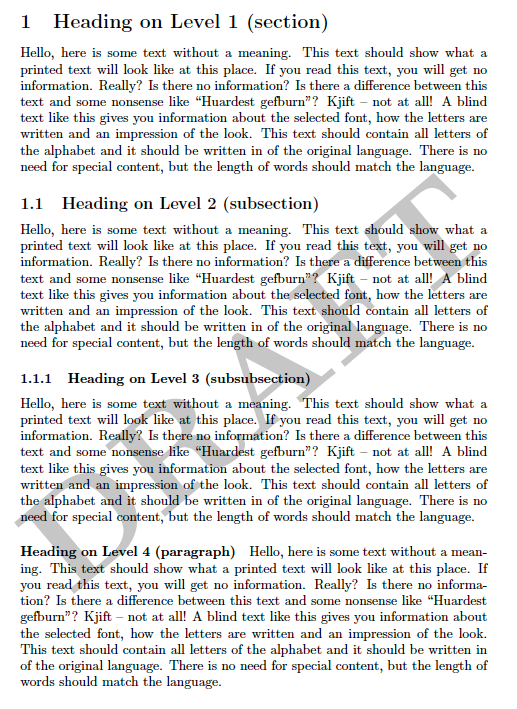
図9.11 – LaTeXページの背景に描画
\documentclass{article}
\usepackage[english]{babel}
\usepackage{tikz,blindtext}
\usepackage{atbegshi}
\AtBeginShipout{\AtBeginShipoutAddToBox{\tikz[overlay,remember picture]]
  \node[rotate=40,scale=10,lightgray,font=\bfseries]
    at (current page.center) {DRAFT};}}
\pagestyle{empty}
\begin{document}
\blinddocument
\end{document}
次の章 へ進む.